Fire Hazard Detection with YOLO and Multimodal AI Systems
This tutorial aims to equip learners with the skills to train, deploy, and integrate YOLO-based fire detection models with multimodal alert systems.

An Introduction to Fire Hazard Detection and Vision AI
Fire is a significant cause of fatalities, property damage, and economic disruptions worldwide. Case in point: the January 2025 Southern California wildfires, which raged between 7-31 January – a series of 7 destructive wildfires affecting the Los Angeles metropolitan area and San Diego County in California, United States. Every year, countless fire incidents lead to immense devastation. Therefore, adopting innovative and efficient early warning technologies is crucial to mitigate their impact. However, fire detection methods confront hurdles like false alarms, detecting fire in complex environments, and real-time processing constraints.
Use Cases of Fire Hazard Detection
- Industrial Safety: Detecting fire hazards in factories and manufacturing units.
- Residential Security: Smart home fire detection integrated with IoT devices.
- Forest Monitoring: Early wildfire detection using drones and satellite imagery.
- Public Spaces: Surveillance-based fire monitoring in malls, airports, and tunnels.
Vision AI and Object Detection - An Overview
Vision AI: Vision AI leverages advanced machine learning and computer vision techniques to analyze and interpret visual data, enabling machines to understand images and videos enhancing automation, decision-making, and real-time monitoring across various applications, including fire detection.
Object Detection: Object detection is a key component of computer vision that identifies and localizes objects within an image or video. In fire detection systems, it aids in the highly accurate recognition of smoke and flames, facilitating prompt reactions and lowering the possibility of false alarms.
Why Choose YOLO (You Only Look Once) Models?
YOLO is a state-of-the-art, real-time object detection system, best known for:
- Their real-time detection with high accuracy.
- Being lightweight and optimized for edge devices.
Prerequisites for the Project: Fire Hazard Detection Using AI
In this guide, we'll build a fire hazard detection system using advanced AI tools. We'll use YOLO for quick real-time object detection, add multimodal and vision models for better analysis, and integrate Zapier to automate alerts and responses.
Before we start, please make sure you have the following in place:
- Anthropic API Key
- Zapier Account & Webhook URL
- Set up Python, PyTorch, and Ultralytics YOLOv8
We will use Google Colab to train our model. Why?
- Smoother execution
- No need to worry about package dependency clashes
- Free GPU accelerator – enough for our training process
- Open Google Colab and choose a new notebook.

- Click on “Connect”, and then click “Change runtime type”.
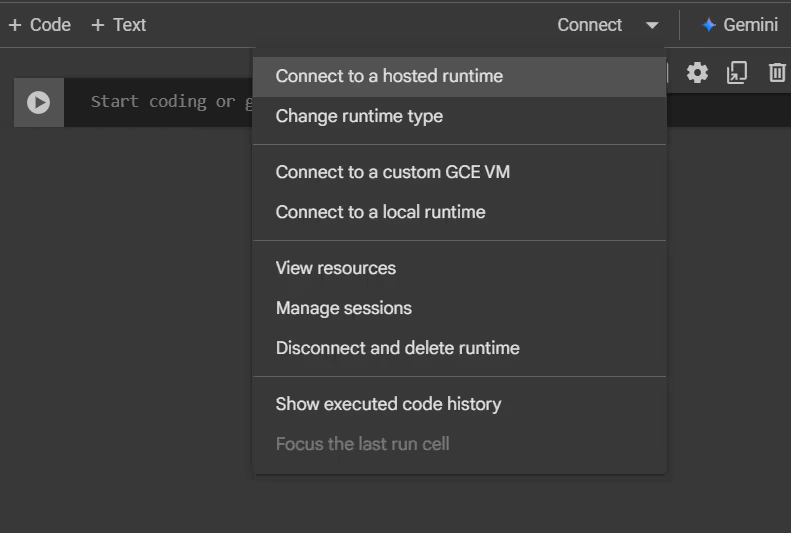
- Choose “T4 GPU” under the hardware accelerator. This helps speed up the training process for our model and, by default, “Python 3” would be chosen for runtime type. Click “Save” to close the dialog box.

- Click on “Connect T4” to start your kernel.

- You can verify your connection once there’s a green tick next to T4, as in the image below.

- Else you can also use:
! nvidia-smi
- Now that your notebook is up and running, go ahead and download the required packages.
!pip -q install ultralytics opencv-python anthropic

from ultralytics import YOLO
from IPython.display import display,Image
import cv2
from ultralytics import YOLO
from IPython import get_ipython
from IPython.display import display
import os
from google.colab.patches import cv2_imshow
import time, base64
from anthropic import Anthropic, HUMAN_PROMPT, AI_PROMPT
Data Preparation for Fire Detection
- Sourcing dataset: Public fire/smoke dataset from Roboflow

- Click on “Download dataset” in the upper right corner.
- Here, choose the option “Download on my own”.

- Choose yolov8 as the format, and select “Show download code”.

- Copy the Jupyter code and paste it into your notebook.

Training YOLO Models from Scratch
YOLO Architecture Overview (backbone, neck, head)
There are 3 essential blocks in the YOLO Architecture and everything will occur in these blocks, which are the Backbone, Neck, and Head. These are described below:
- Backbone: A deep neural network that extracts feature representations from input images, capturing essential spatial and contextual information.
- Neck: It acts as a bridge between the backbone and the head, performing feature fusion operations and integrating contextual information. It is a set of additional layers that aggregate features at different levels, improving object localization and small object detection.
- Head: The final part of the architecture that’s responsible for generating the network’s outputs, such as bounding boxes and confidence scores for object detection.

Configuring Hyperparameters
- Batch Size: Determines the number of samples processed in one training iteration. A larger batch size speeds up training but requires more memory.
- Learning Rate: Controls how much the model’s weights are adjusted per update. Adaptive learning rates (e.g., cosine annealing) help achieve better convergence.
- Epochs: The number of times the entire dataset is passed through the model during training. Finding the optimal number of epochs prevents overfitting or underfitting.
- Anchor Boxes: Predefined bounding box shapes used to detect objects of varying sizes. Optimizing anchor boxes enhances detection accuracy.
Transfer Learning v/s Training from Scratch
Transfer Learning: Uses a pre-trained YOLO model (trained on large datasets like COCO) and fine-tunes it on fire detection data. This approach significantly reduces training time and improves accuracy when labeled data is limited.
Training from Scratch: Initializes YOLO with random weights and trains it entirely on a domain-focused dataset. This requires extensive data and computational power but allows full customization.
Comparison: Transfer learning is preferred for rapid deployment and limited data availability while training from scratch is beneficial for highly customized models.

Training YOLOv8 Model on a Fire Detection Dataset
Let’s dive back into our notebook to train our model on the dataset we exported earlier from Roboflow.
- We need only this one line of code to start the training process.
!yolo task=detect mode=train model=yolov8m.pt data = {dataset.location}/data.yaml epochs = 20 imgsz = 640 plots = True
The training process will take approximately 3-4 hours with T4 GPU.

Model Evaluation & Optimization
Model evaluation and optimization is important to evaluate the performance of your fire detection model using several key metrics:
- Mean Average Precision (mAP): This metric is widely used to evaluate object detection models. It calculates the average precision (AP) across different classes, giving a global measure of the model's ability to correctly identify objects. Higher mAP values indicate better model performance.
- Precision: Precision is the proportion of true positive predictions among all the positive predictions made by the model. It answers the question: "Of all the detections the model made, how many were correct?" Precision is crucial when minimizing false positives (incorrect detections).
Precision=TP / (TP+FP) - Recall: Recall measures the model’s ability to correctly identify all relevant objects (true positives), answering the question: "Of all the actual fires, how many did the model detect?" It is important for minimizing false negatives (missed detections).
Recall=TP/(TP+FN)
4. F1-Score: The F1-score combines precision and recall into a single metric that balances the two. It is the harmonic mean of precision and recall, providing a good overall indicator of model performance when both false positives and false negatives are important to minimize.
F1 = 2 (Precision Recall/ Precison +Recall)
Let’s go back to our notebook and check our results for our validation dataset:
!yolo task=detect mode=val model=runs/detect/train/weights/best.pt
data={dataset.location}/data.yaml
Here are the precision, recall, and F1 scores for both fire and smoke based on the provided metrics:
For fire:
- Precision = 0.591
- Recall = 0.599
- F1 Score = 2×0.591×0.599/0.591+0.599 ≈ 0.595
For smoke:
- Precision = 0.575
- Recall = 0.379
- F1 Score = 2×0.575×0.379/0.575+0.379≈0.4532
Insights from Results
Fire Class:
- Precision (0.591) and Recall (0.599) for the fire class are relatively close, indicating that the model is fairly balanced in detecting fires, both in terms of true positives and not missing actual fire instances.
- The F1 Score (0.595) is also fairly solid, showing that the model is performing well for fire detection, striking a good balance between precision and recall.
Smoke Class:
- Precision (0.575) for smoke is decent, but Recall (0.379) is lower, meaning the model detects fewer actual smoke instances than fire instances. This indicates a higher number of false negatives for smoke detection, suggesting the model may be missing many smoke events.
- The F1 Score (0.453) reflects this imbalance. It’s lower than the fire class F1 score, which points to the model needing improvement in detecting smoke.
Deploying YOLO Models for Real-Time Inference
Real-time inference with OpenCV involves loading a trained YOLO model, processing video frames, and making predictions on each frame in real-time. This typically includes:
- Loading the Model – Loading the trained YOLO model for inference.
- Capturing Frames – Reading video frames from a webcam or video file.
- Preprocessing – Resizing, normalizing, and converting frames are usually done in this step; however we have passed frames directly for inference.
- Running Inference – Feeding frames into the model to detect objects.
- Post-Processing – Interpreting model outputs, drawing bounding boxes, labels, or other visual cues.
For this part of the implementation, we will use Fire Video from Shutterstock.
You have to download and upload it to your Colab setup.

- Click on the Upload icon on the left and choose the file.
- Next, let's go to our notebook; we will run the code below:
model_path = "/content/runs/detect/train/weights/best.pt"
# in colab notebook this is where you will find your trained model
# Check if file exists
if not os.path.exists(model_path):
    raise FileNotFoundError(f"Model file not found at: {model_path}")
# Load your model
model = YOLO(model_path)
3. Initialize a VideoCapture object that handles video stream:
cap = cv2.VideoCapture("/content/fire2.mp4") # Path to your video file
- For frame processing, use the following code:
while cap.isOpened():
    ret, frame = cap.read()
    if not ret:
        break


    results = model.predict(frame, conf=0.5)
    for r in results:
        for box, conf, cls in zip(r.boxes.xyxy, r.boxes.conf, r.boxes.cls):
            label = r.names[int(cls)]
            if label == "fire":
                x1, y1, x2, y2 = map(int, box)  # Get bounding box coordinates
                cv2.rectangle(frame, (x1, y1), (x2, y2), (0, 0, 255), 2)
                cv2.putText(frame, f"{label} {conf:.2f}", (x1, y1 - 10), cv2.FONT_HERSHEY_SIMPLEX, 0.5, (0, 255, 0), 2)


                resized_frame = cv2.resize(frame, (640, 360))
                cv2.imwrite("snapshot.jpg", resized_frame)


cv2_imshow(frame)Results:
This cell will take a bit longer to execute, and the expected results will have frames, either with no detection or marked with a red bounding box detecting fire.


Multimodal AI for Enhanced Fire Detection
Vision AI Models:
Vision AI models use deep learning techniques to interpret and understand visual data. These models are designed to identify objects, detect anomalies, and segment images for tasks like object detection, facial recognition, and image classification.
Anthropic’s Claude 3 Opus:
Claude 3 Opus, the most advanced model in Anthropic’s Claude 3 family, is designed for superior language understanding and generation. It excels in complex reasoning, multilingual proficiency, and contextual awareness while maintaining a strong focus on safety and ethical AI alignment. As a multimodal model, it can process and analyze both text and visual data, making it highly effective for applications requiring deep comprehension, structured output, and real-time adaptability across various domains.
Begin with setting up the Anthropic API Key, ensure it's there as a secret in your Colab with access shared to the notebook you are working on.
You can access the key using the code:
from google.colab import userdata
API_KEY = userdata.get('anthropic_api_key')
client = Anthropic(api_key=API_KEY)
Setting up the model to generate a warning for fire detection:
MODEL_NAME = "claude-3-opus-20240229"


with open("/content/snapshot.jpg", "rb") as image_file:
    binary_data = image_file.read()
    base_64_encoded_data = base64.b64encode(binary_data)
    base64_string = base_64_encoded_data.decode('utf-8')


    # Prepare the message for the Anthropic API
message_list = [
    {
        "role": 'user',
        "content": [
            {"type": "image", "source": {"type": "base64", "media_type": "image/jpeg", "data": base64_string}},
            {"type": "text", "text": "Generate a fire alarm warning to alert the user about the detected fire  and specify its location. Ensure message is clear and concise."}
        ]
    }
]


response = client.messages.create(
    model=MODEL_NAME,
    max_tokens= 100,
    messages=message_list
)
print(response.content[0].text)
Results:
You will get a warning like this generated, which will describe the surroundings where fire has begun alerting the user.
WARNING: Fire detected coming from electrical outlet! Unplug all devices immediately and evacuate the area. Call emergency services if the fire spreads or cannot be quickly extinguished safely.
This is it. We have successfully trained our model. Let's export our trained model weights, to use them in a web application.
from google.colab import files
files.download('/content/runs/detect/train/weights/best.pt')
Fire Detection and Alerting Workflows
Now, we will develop a web application that prompts the user to upload a video and, in case of fire detection, a warning is generated and the user is notified through Gmail. The code for the frame processing and warning generation would be almost similar to the Jupyter Notebook code.
The most essential part would be the implementation of sending alerts over Gmail to the user, and for this, we would use Zapier.
Getting Started with Zapier
- Head over to Zapier Login Page, and create your account.
- On the home page, choose Zap.

- After clicking on it, you will land on the Zap drafts page, which looks like this.

- Click on Trigger and choose Webhooks.

- From there, App Setup dialog box will appear; click on Trigger Event and choose Catch Hook.

- Afterwards, click on Continue.
- Leave the Child Key textbox empty and click on Continue.

- Copy the webhook URL, and click on Test Trigger. Keep the URL safe for future use.

We will get back to this later. For now, head to your IDE.
If not already installed, you can get Miniconda from here. Miniconda should be up and running with your IDE. In case you face any issue, follow this guide.
Start by creating a folder for your project. In the terminal, navigate to that directory and create a virtual environment using:
conda create -p C:\Users\HP\OneDrive\Desktop\testing .\testenv2 python=3.12*Replace “C:\Users\HP\OneDrive\Desktop\testing” with the path of your directory and “.\testenv2” with the environment name.
Check for the environment; this should return your environment’s name:
conda env listActivate environment:
conda activateNow that environment is activated, create a file in the same folder, requirements.txt, and include the packages:
streamlit
cv2
ultralytics
anthropic
dotenv-python
requests
Download the requirements:
Pip install -r requirements.txt
Create another file .env and store your Zapier Webhook URL, and API keys here:
ANTHROPIC_API_KEY = “ANTHROPIC_API_KEY”
EMAIL_ADDRESS = user@gmail.com
EMAIL_PASSWORD = password123
ZAPIER_WEBHOOK_URL = https://hooks.zapier.com/hooks/catch/abcde/fghij
Create another file app.py, in the folder.
Our main code will be in this file, which we will divide up into 4 essential blocks or functions:
- Importing modules
- Processing frames
- Generating warning with Claude Opus
- Alerting the user
- Main function
Step 1: Importing Modules
# Import necessary modules
import streamlit as st
import cv2
import time
import base64
from ultralytics import YOLO
from anthropic import Anthropic
import os
from dotenv import load_dotenv
import requests
Load the environment variables, fetch your API key, and create another global variable that tracks the warning message generated by the vision model.
load_dotenv()
# Global variable to store the warning message
warning_message = None
# Initialize the Anthropic client
ANTHROPIC_API_KEY = os.getenv("ANTHROPIC_API_KEY")
client = Anthropic(api_key=ANTHROPIC_API_KEY)
Step 2: Loading YOLO Model
#(Cached to prevent reloading of model)
@st.cache_resource
def load_yolo_model():
    """Load and return the YOLO model for fire detection."""
    model_path = "C:\\Users\\HP\\Downloads\\best.pt"
    return YOLO(model_path)
Step 3: Frame Processing & Fire Detection
def process_frame(frame, model):
    """
    Processes a video frame using the YOLO model to detect fire.


    Args:
        frame (numpy array): The video frame.
        model (YOLO): The preloaded YOLO model.


    Returns:
        tuple: Processed frame and a boolean indicating fire detection.
    """
    results = model.predict(frame, conf=0.3)
    fire_detected = False


    for r in results:
        for box, conf, cls in zip(r.boxes.xyxy, r.boxes.conf, r.boxes.cls):
            label = r.names[int(cls)]
            if label == "fire":
                fire_detected = True
                x1, y1, x2, y2 = map(int, box)
                cv2.rectangle(frame, (x1, y1), (x2, y2), (0, 0, 255), 2)
                cv2.putText(frame, f"{label} {conf:.2f}", (x1, y1 - 10),
                            cv2.FONT_HERSHEY_SIMPLEX, 0.5, (0, 255, 0), 2)


    return frame, fire_detected
Step 4: Generating Warnings
def generate_warning(frame):
    """
    Generates a fire warning message using the Anthropic API and takes a snapshot.


    Args:
        frame (numpy array): The video frame where fire is detected.


    Returns:
        str: The generated warning message.
    """
    global warning_message


    # Save a snapshot of the frame
    snapshot_path = "snapshot.jpg"
    resized_frame = cv2.resize(frame, (640, 360))
    cv2.imwrite(snapshot_path, resized_frame)


    # Encode the snapshot as base64
    with open(snapshot_path, "rb") as image_file:
        binary_data = image_file.read()
        base64_encoded_data = base64.b64encode(binary_data).decode('utf-8')


    # Prepare the message for the Anthropic API
    message_list = [
        {
            "role": "user",
            "content": [
                {"type": "image", "source": {"type": "base64", "media_type": "image/jpeg", "data": base64_encoded_data}},
                {"type": "text", "text": "Generate a fire alarm warning to alert the user about the detected fire and specify its location. Ensure the message is clear and concise."}
            ]
        }
    ]


    # Get the warning message from the API
    response = client.messages.create(
        model="claude-3-opus-20240229",
        max_tokens=80,


        messages=message_list
    )
    warning_message = response.content[0].text
    return warning_message
Step 5: Sending Notification Alerts Using Zapier
# Function to send a fire warning notification via Zapier webhook
def send_notification_via_zapier(warning_message):
    """
    Sends fire warning notification using Zapier webhook.

    Args:
        warning_message (str): The warning message to be sent.
    """
    data = {
        "message": warning_message,
        "alert_type": "Fire Detected 🚨",
    }


    try:
        response = requests.post(ZAPIER_WEBHOOK_URL, json=data)
        if response.status_code == 200:
            print("Notification sent successfully via Zapier!")
        else:
            print(f"Failed to send notification. Status code: {response.status_code}")
    except Exception as e:
        print(f"Error sending notification: {e}")
Step 6: Main Function
# Main Streamlit Application
def main():
    """Main function to run the Streamlit application for fire hazard detection."""
    global warning_message  # Use the global variable to persist warnings


    st.title("Fire Hazard Detection WebApp")
    st.sidebar.header("Controls")


    video_file = st.sidebar.file_uploader("Upload a video file", type=["mp4", "avi", "mov"])


    if video_file:
        # Save uploaded video locally
        video_path = video_file.name
        with open(video_path, "wb") as f:
            f.write(video_file.read())


        cap = cv2.VideoCapture(video_path)
        st.sidebar.text("Video uploaded successfully.")


        # Load the YOLO model
        model = load_yolo_model()
        video_placeholder = st.empty()
        warning_placeholder = st.empty()


        while cap.isOpened():
            ret, frame = cap.read()
            if not ret:
                break


            # Process the frame
            processed_frame, fire_detected = process_frame(frame, model)
            video_placeholder.image(cv2.cvtColor(processed_frame, cv2.COLOR_BGR2RGB), channels="RGB")


            # Generate warning if fire is detected
            if fire_detected and warning_message is None:
                warning_message = generate_warning(frame)  # Generate warning
                send_notification_via_zapier(warning_message)  # Send notification via Zapier


            # Display the warning message (persist if already generated)
            if warning_message:
                warning_placeholder.error(warning_message)


            time.sleep(0.1)  # Add delay for smooth video display


        cap.release()


if __name__ == "__main__":
    main()
Step 7: Saving the file, and in your terminal running:
streamlit run fire.pyThis will start a web application.

Click on the sidebar, and upload a video with fire. You can upload the same video we used in our notebook.

Keep this application running until you see a warning generated.

Soon after this, head to your Zap drafts. Here you will see a new record; choose the record, and click on Continue with the selected record.

This page should appear – choose Gmail.

This setup box should open. Under the Action Event, choose to Send Email and add your Gmail in the account tab, then click on Continue.

In the next part, set the receiver’s email address and other details.

Add subject and, for the body, click on the + sign and choose Message.

Finish and click on Continue; on the next page, click Test Step.

You can check the received mail.
Note: If Gmail setup fails with Streamlit, you can resolve the issues by following the steps mentioned in this discussion.
Hurray! With this you have successfully set up the alert system.
Next Steps
Launching an AI-powered application or building an AI feature doesn’t require massive upfront investments or a dedicated internal team. Superteams.ai enables businesses to start with a focused, cost-effective proof-of-concept—using your existing data—to validate ROI before scaling.
Ready to get started?
Let’s discuss your data, goals, and challenges. In 30 minutes, we’ll outline a roadmap to build an AI system that delivers accurate, reliable, and actionable results—not hallucinations.
Request a meeting now:
Authors

Want to Scale Your Business with AI Deployed on your Cloud?